
To go along with the notes i made in the workshop i also took screen shots to remind me where everything is and what it has to do. The screen shots work from the beginning to the end, and take you through the process of actually doing a basic animation. They are just good reminders for me in the future. The majority of the images will have text to evaluate but some are fairly straight forward.

This is the workspace window that allows you to load a different window to
what you're actually working in. For what we are doing it would stay as standard.

This shows how to close the menu. If you do close a window you can
get it back by going to the workspace menu and 'reset to standard'.

You can alter the appearance of the software making it lighter and darker,
seeing how you want to look at it and what is easier for you.

This is the way you can import images into After Effects, either photoshop
or illustrator. Just by selecting the 'File...' option.

This is the way to create a new composition within After effects, compositions
hold the frame of animation where you create the playback.


The 'Presets' within the option menu are about the standard definition in which
videos are shown in different countries. PAL - Stands for UK and NTSC - USA.
They have different frame rates. PAL Widescreen Square Pixel, is the one most
applicable to what i am doing as it works with square pixels because of what
i would produce in photoshop.

Within this menu you can also change the duration of your sequence
which i will need to do for mine as its important for image based sequences
not video or sound as you cant change them.

This is the first composition i created in the project bar, this becomes an asset.
This is the time line bar.

If you have done anything wrong, you can easily fix it by going back to the
composition men and going to settings to alter anything you need to.

This is how you create a new layer, a new solid is what we were creating today.
Its just a simple layer and can easily be manipulated.


This is where you can alter the size of the layer you are creating.
I did a smaller square so that it fitted within the composition.

Solid Folder is then added to the composition folder so it all becomes another asset.
This is also where something would go once it had been imported.

The colour then becomes a long red bar within the time line section so you can see what
it is. Each bar has a different colour i.e music (blue) etc.


You can change the duration of the asset by clicking and dragging it.
Shortening it or making it larger. So that it only plays within a certain amount
of time, thus controlling the time sequence.
You can control how longs it played and when its played with this technique.

Adding another layer and colour.

These are the 3 layer blocks that i have created and what they
look like within the time sequence bar. I have also altered the lengths,
of the bars so that they overlap slightly.

Composition space, empty at the moment.

When you move through the current time indicator it will then show up
with the corresponding box. Which is shown below:


All of the above images show the sequence as the time line moves across.

This is the window that you use to play the sequence within
the composition window.

When you play the sequence it comes up with the fps. sequence in the
information window. Showing the realtime play. This is very simple but it
will get more complicated, so this needs changing.

You change it by doing the RAM preview because it actually plays in
an accurate real time playback.

The green line shows when the RAM is when its converted.
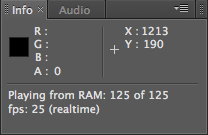
The information menu then changes when its played in RAM
with a more accurate reading.


If the composition is taking a while to play then you can change the resolution
with the resolution/down factor pop-up.

These are the options that show. I set it to quarter.

This is what the image looks like when you quarter it. You lose a lot of quality
but it performs faster.

Another way to preview the selection is to narrow down the 'work area bar'
which is the grey bar so you only see that bit.

Each layer comes with properties, and always comes with a transform.

When you select the transform area it immediately folds down
to show a lot of options. You can set different values for the numbers
by moving the numbers.

You can create KEY FRAMES by selecting the small stop watch and using the
current time indicator.

Little stopwatches at the side of the properties.

Creating a key frame using one of the time indicator and the selection
in the properties menu.


This is movement using the KEY FRAMES. Creating motion path.
This mimics the illustration work you do when creating paths.

These are the steps you have to take in order to render it and turn it into a
Quick Time preview to load onto our blogs.


its been really useful creating these screen shots then going back through them, just to remind me of the step and to see how smoothly it goes. I will now always be able to refer to this.
0 comments:
Post a Comment