
Again for the 2nd workshop we had i screen shotted throughout it, in order to help me understand what I have done and what to do in the future. I have annotated each image just so i can remember what they all represent. This workshop was more specific to designing and importing text into after effects and then working with it. I really enjoyed this workshop because i felt like i was really creating something, it was extremely satisfying.
The Tool bar that is along the top of the After effects project window.
Here you can create your own type and font, if you don't want to do anything
fancy with it.
PHOTOSHOP


Photoshop has a lot of presets. The one im interested in
when creating a photoshop document is for film and video,
it then customises the screen accordingly.

Again you have to change the settings to PAL

when you create the document you get greeted with a grid.
This grid represents two zones. The inside - Title safe zone, this
is the area recommended in order to keep your sequence within.
The outside - Action safe zone, anything here will be completely missed
off.


The above process shows how you can produce the same
grids on After Effects so you can see where its going to
show up and where to space everything.


You need to crop the word that you want to use so that when you import it
it doesn't take up the whole frame.
IMPORTING

1. Importing the first images as FOOTAGE. This is the
simplest way to import a file into photoshop.

When you select it, it will then ask again if this is what you want
check again it is and then click okay.

It will then turn up in the project box again, so you can see
the image you have imported.

You can then drag it into the timeline box or into the composition to
get it into the frame and start working with it.

Change the background in order to check that the background has been deleted
and the word is the main thing you have on screen.

If you want to change anything about the word then the best way
is to change it in photoshop and then in After Effects, right click in the project box
and click reload footage.

With regards to collect files this is a way to package all the text and images
and everything you have done, much like in-design.

If you want to edit the type in photoshop, you need to type
whatever the text is and then rasterize the type so you can work
with it as an image instead of type.

You then need to use the selection tool to make the cut that you want around the type
and then select the 'layer via cut' this will make a new layer with the other part cut on it.
This is simple and easy technique to use.


Above is an example of a word being cut and the different layers.

selection - layer via cut


When you import the images as FOOTAGE again, you can
then select the individual layers and move them around as you
would with the previous workshop we did.
IMPORTING
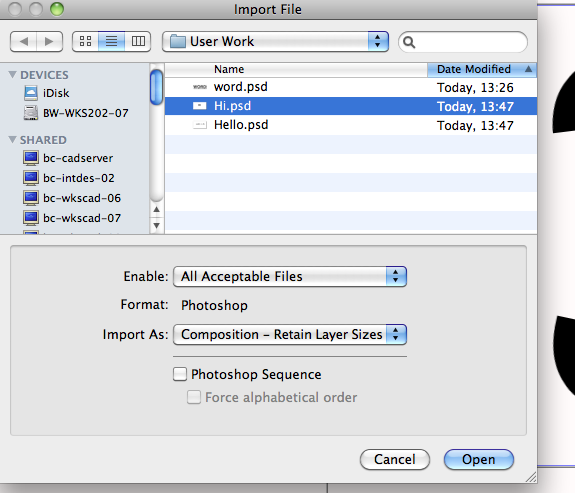
2. This time you import the files as a composition.
This is a bit more complex keeping everything separated.

It will turn up as a composition, in the project folder.

By selecting the Composition retain layers, this means
that the anchor points will stay around the individual letters.
ILLUSTRATOR

again same process as photoshop except doesnt come
as PAL widescreen sqaure pixels it only comes as PAL widescreen.
This is because it works in vectors and doesn't need sqaure pixels.

Again you get a similar screen with the guides.


If you want to move an object onto a separate layer in order to animate on
its own then in the layers box you click and drag the square onto the new layer
you have created.

Example of the layers being split.

When you import the vector image into After effects it
will automatically rasterize it making it pixelated
so in the time line options you click the box in the middle
making it un-rasterized so when you blow it up it won't
be all square.
0 comments:
Post a Comment